
One of the biggest challenges we hear that people have is touching up roots in the back of the head. Applying paste to areas that you cannot see can feel frustrating, overwhelming, and messy. It takes practice to become a master of touching up roots in the back of the head, but that doesn’t mean you can’t do it.
Tip #1: Clean Sections are Important
Sectioning your hair will help you be more organized and precise with your application. This alone can be very helpful with setting yourself up for a successful root touch up. Below is a video that goes over how to section your hair:
When grabbing hair, it should be 1/4 of an inch thin or thin enough to read a newspaper through. This amount of hair will allow the paste to get on every bit of hair, and will prevent a spotty application.
Further more, with clean sections, you’ll be able to find the next following subsection a lot easier.
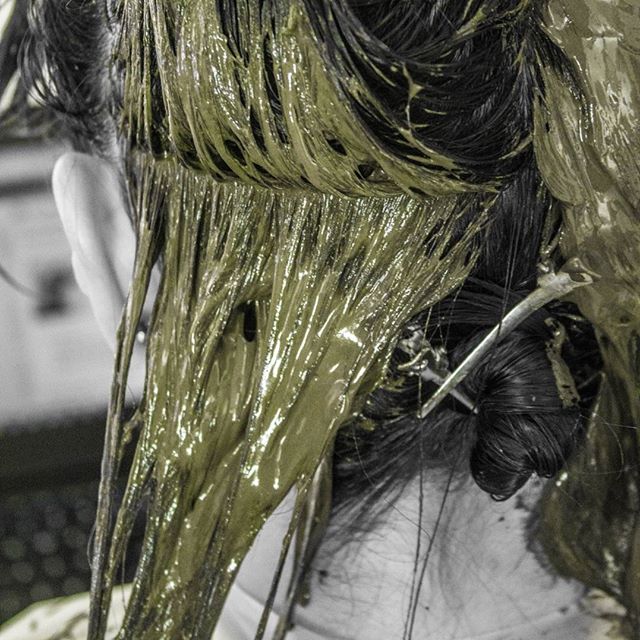
Tip #2: Try not to goop your product on your hair
I don’t know how many times I hear or see people glopping on different forms of hair color, including henna. If that works for you, that is totally okay, but if you’re new or trying to cover up every bit of roots, this method is no good. I’ll admit, even though I am a stylist, I’ve gooped heaps of indigo on my roots out of desperation before, because I was tired and wanted to go to bed. I knew better, but I was already committed and down to the last section of hair in the back. I ended up having to redo most of my hair the next day, which was frustrating, but it was my own fault. In addition to not getting the coverage I wanted, I made a much bigger mess than usual, which caused me to have to clean a lot more.
Why “gooping” isn’t Effective
When you apply your paste in goops, you’re clumping hair together and missing sections. You’re also overlapping, which is totally okay if you don’t mind the rest of the hair getting darker. This can also cause someone to use way too much product and be really messy.
You’ll find it harder to pull up your next subsection because the paste from the previous subsection likely will have spread to other parts of the hair. When paste gets on parts of the hair that you’ve not gotten to yet, it will dry and make hair stick together. This can be annoying and painful. Plus it makes the application take longer.
Tip # 3 Utilize Mirrors
Mirrors can be your best friend for touching up roots in the back of the head. The down fall is hand free mirrors can be expensive.
There are moveable hands free mirrors that have an arm that connects to a wall. They cost $30-$40 and can be helpful if placed across from a bigger mirror, such as a bathroom mirror. You’ll want to figure out the best placement before drilling the holes in your wall, just to make sure that you can see the back of your head nicely. If you have a lot of space between your bathroom mirror and your wall, this trick may not quite work.
There are stand alone mirrors with wheels that could act in place of a bathroom mirror, but these tend to be $100+. The investment may be worth it, depending on how much you struggle with doing your application and how often you touch up your roots.
Finally, you could possible rig your own mirror on a stand. This should be done carefully, but if you enjoy DIYs, this may be the best route for you!
Tip # 4 Lighting
Good lighting s important when touching up your roots. LED lights are bright and helpful when trying to do your application, because it will allow you to see every nook and cranny.
It’s helpful if the light is mobile so that you’re able to change the lighting placement. This is excellent for areas on the head that are a little more difficult to see, such as the back. A ring light on a tripod would work nicely since they are generally light weight and have the ability to move around to different angles.
Tip # 5 Practice, Patience, and Persistence
Mastering self root touch ups take practice, patience, and persistence. It’s definitely a realistic goal that you can master, but it’s important that you don’t give up. Give yourself time to adjust, especially if you’ve never done your own hair before. You’re using your muscles in a different way and stretching your arms in an unusual manner.
Have patience with yourself. It’s okay if you don’t complete a perfect root touch up right away. You’ll do better the next time and even better the time after.
Finally, persistence. Use the same method of touching up several times before giving up and switching how you do your touch up. Set a schedule for how often you’d like to do your roots and stick to it. Make it a self pamper day or evening!
Practice, patience, and persistence are key for doing a good root touch up. Sure, your first couple of times may not be the greatest, but if you keep up with the same routine, you’ll nail it in no time.
Tip # 6 Practice with Conditioner or Cassia
This goes with Tip #5! If you feel like you’re not ready to do the back of your head with your henna mix, then use a thick conditioner or cassia. Both are great for the hair and can help you gain more confidence in your application. Neither of these will alter your hennaed hair, so you can practice as much as you’d like.
Tip # 7 Utilize Towels
It’s important to wipe off your hands when you’re working with hair in the back of the head. Having messy hands will cause paste to get on other bits of hair and dry out. Dried out paste is hard to comb through and can just be a minor annoyance.
When I do my roots, I quickly wipe of my hands when they start getting paste on them. I keep a towel over my sink for this purpose, and another smaller, damp towel off to the side.
Tip # 8 Get Familiar with your Head
Get used to the shape of your head. Try closing your eyes and placing your hands on the back of your head. Feel the shape. Grab sections of hair to get adjusted to feeling the thickness of your hair. Visualize you applying paste the hair. Stretch your arms to the bottom of your hair line (the nape of your neck) a few times a week to help get these muscles adjusted to moving in a new way.
Doing a mock root touch up with nothing, except the utensils you plan on using (hands, carrot bag, and/or hair color brush) can help you get familiar was well. The two biggest challenges of overcoming touching up roots in the back of the head is 1) being able to apply paste in areas you cannot see and 2) being able to successfully feel where you need to separate your hair to apply more paste.
Tip # 9 Bribe a Family Member, Friend, or Spouse
Before getting to this part, I encourage you to keep trying. However, if all else fails and you just cannot get the roots in the back of the head, find a henna buddy, if you can do it safely. Sure, you may need to shell out a few bucks, a special home made dinner, or dessert, but it’ll be worth it! The touch up may not be perfect, but it can save you frustrations.
For more information on root touch ups, check out these links: https://www.ancientsunrise.blog/full-coverage-roots/ https://www.ancientsunrise.blog/how-to-measure/
You can always contact customer service for support! Visit https://www.mehandi.com/Articles.asp?ID=256
 Maria • Licensed Cosmetologist • Ancient Sunrise Specialist